Chances are you’ve heard of skin needling (also called dermal stamping, skin stamping, or micro-needling) and seen the immediate red skin that results and wondered ‘Why would anyone do that?’. Well, it’s honestly not as scary as it may at first appear. We all want to have great looking, smooth, even-toned, healthy skin. Sadly, fillers, nerve relaxants, or surgery cannot help us in this cause. Great skin comes from a good skin regime at home with the assistance of professional skin treatments. So, where and how does skin needling, or micro-needling, fit into the picture?
What is Skin Needling?
Skin needling is the process of making micro-injuries to the skin with needles using either a roller, stamp or electronic pen. The first record of this treatment being performed was in 19052. Then, in 1995, Dr Desmond Fernandes pioneered the current procedure.
Initially, needling was performed to stimulate collagen, elastin, and GAG production in the dermis (the second layer of the skin) via a wound-healing response. It was also used to break down scar tissue mechanically. So, what does this mean?
Understanding the basic anatomy of the skin
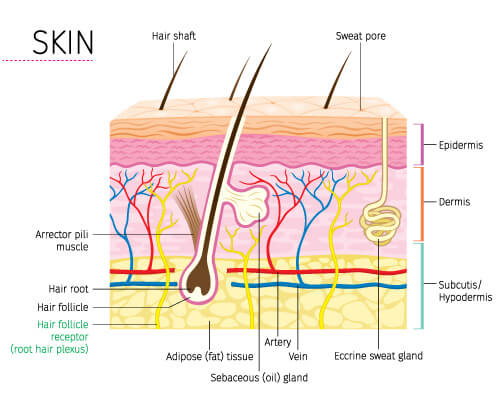
The skin is made up of 3 layers:
- the epidermis,
- the dermis,
- the hypodermis.
The first layer or membrane, the epidermis, is made up primarily of cells called keratinocytes. Keratinocytes are created by the stem cells at the base of this membrane (called basal cells). Here we also find melanocytes which are responsible for producing pigment (melanin).
The second layer is called the dermis and is a connective tissue made up of collagen, elastin, and GAGs (glycosaminoglycans). The fibroblast cells produce these substances. Here we also find an abundance of blood and lymph vessels, and nerves.
The dermis sits above the hypodermis which is made up of fat cells as well as blood and lymph vessels, and nerves.
What does this have to do with Micro/Skin Needling?
Many skin treatments including skin needling (and some topical ingredients) aim to stimulate the fibroblasts in the dermis to make healthy collagen, elastin and GAGs (this is how vitamin A works). Fibroblasts are stimulated as part of a wound-healing response. For this reason, a small/micro-injury leads to stronger, healthier skin. The collagen fibres provide the skin with tensile strength, and they bind water making the skin more hydrated, while the elastin fibres provide elasticity or movement. The GAGs maintain and support the collagen and elastin.
What we know now?
We’ve learnt that skin needling does so much more! We now understand that micro-needling reboots our skin, so it functions optimally. How so?
Skin needling balances keratinocyte production, making thin skin thicker and thick skin smoother. We’ve also learnt that excess keratinocyte production leads to blackheads and whiteheads, aggravating acne. What this means is that these conditions improve with skin needling.
- The other benefits of micro-needling are:
- It normalises oil production, which also assists with acne, oily, or dry skin. It isn’t recommended on inflamed acne.
- The melanocyte function is balanced, so pigment evens out.
- The production of collagen, elastin, and GAGs is optimised, leaving skin plump, firm, and elastic.
- Collagen fills wrinkles and indented scars, making the surface smooth while both collagen and GAGs retain water which keeps the skin hydrated and moist (making it a great wrinkle treatment).
We have also discovered that keratinocytes produce growth factors and other enzymes that communicate with other cells in the skin. These growth factors stimulate fibroblast cells; hence, keratinocytes produce collagen as well as fibroblasts.
Your Guide to skin/micro-needling
Let’s look at the process of skin needling (simplified for you), from home preparation before a salon treatment right through to aftercare and precautions.
Home Needling
Before having any salon needling treatments, it is recommended that you do some preparation at home. Needling at home will maximise the absorption of active ingredients and stimulate the growth factors produced by keratinocytes. The result? An improved barrier function (which is essential before having any salon treatments). Home preparation will optimise the results of your clinic/salon treatments.
Prepare your skin for a clinic/salon treatment for at least three weeks beforehand. Use a roller with needles about 0.25mm long. Start by needling your face, neck, and chest only every two or three days and work up to daily.
People generally prefer to roll at night so the redness can subside by morning. It’s easier to use short strokes. Roll in different directions and keep removing the roller from the skin, so the needles don’t enter in the same positions, causing track marks.
After you’ve rolled, apply your active ingredients. Key active ingredients recommended for home use are:
- Vitamin A to stimulate the fibroblasts
- Vitamin C and Copper Peptides are required for collagen production
- Hyaluronic acid helps with hydration
- Antioxidants.
These ingredients are recommended for use at home after the salon treatment as well.
Wait for the active ingredients to be absorbed into the skin before applying any moisturiser. The tiny holes close within an hour making it safe to apply mineral makeup the next day. (According to Dr Setterfield, needling channels generally close after 10 – 15 minutes, making this a very safe treatment3.)
Once you’ve finished, follow the manufacturer’s directions for cleaning the roller.
Remember, sunscreen is crucial in preventing damage from UV radiation, especially if you are needling.
Note: If your skin feels sensitive afterwards, stop until it is comfortable. If irritation occurs, STOP immediately!
A little help with aging
In his book, The Concise Guide to Dermal Needling1, Dr Setterfield recommends the following supplements for an anti-ageing regime at home:
- Omega 3
- Glucosamine
- Multivitamins.
Salon/Clinic Needling, Then & Now
We’re grateful for the advances we’ve made in skincare treatments over the last century! Back in the early days, it was believed that bleeding was required for a successful needling treatment, these days we know better. Today we don’t want to see bleeding at all; instead, we want to achieve an even redness.
In the past, it was also thought that the needles needed to reach the lower dermis to achieve collagen induction. We now know that the keratinocytes also stimulate collagen production by communicating with the fibroblasts in the dermis; therefore, we don’t need to go as deep. These days we aim to reach the undulating junction between the epidermis and the dermis (Dermal/Epidermal Junction or DEJ) where wrinkles and superficial scars are formed, and melanin is produced. For this reason, modern needles are much shorter than before, making the treatment more comfortable.
The needle depth is determined by the technician based on the skin thickness of the treatment area and the condition being treated. Skin thickness will vary depending on which part of the face or body is being treated and the individual. Some scars, such as acne and chickenpox scars, as well as deeper wrinkles, may need a deeper treatment. An over-the-counter anaesthetic will be required for these treatments.
Electronic pens make micro-needling treatments less painful, allowing some people to tolerate them without anaesthetic. However, pain is individual. If you find this treatment painful, you can have a topical anaesthetic compounded for you by a compounding pharmacist. Apply this before the treatment according to the package directions.
Wait two days after your treatment before resuming your normal skincare regime (especially the application of Vitamin A). Home rolling may be performed after five days.
How often should you have salon/clinic needling?
How often you have a salon needling treatment will depend on the type of treatment and your age group. As a guide:
Salon treatments can be performed every four weeks – any sooner, and it will interrupt the wound healing cycle.
- For anti-aging treatments, it is recommended that you have
- four treatments a year if you are over 65
- three treatments a year if you are between 35 and 65 years old
- two treatments a year if you are under 35.
Anti-aging treatments can be done as a course or interspersed between other treatments.
- Repeat treatment every two months for indented acne scars.
- Repeat treatment every two weeks for hypertrophic scars.
At home, rolling can be done daily. Start rolling twice a week and work your way up to doing it daily. You can do home rolling year-round.
Salon treatments are not recommended in summer as the UV radiation destroys the new collagen that has been induced. Sun exposure also increases the risk of hyperpigmentation.
Can you combine needling with other treatments and treatment packages?
Combining needling with any treatment modality besides LED is not recommended. LED can be applied immediately afterwards to reduce redness and inflammation and to stimulate the fibroblast cells further. Red light also enhances keratinocyte proliferation. LED is also an excellent treatment to perform in the weeks following your treatment.
You should also be aware of the following guidelines;
- Don’t use hydroxy acid peels and scrubs on the same day as needling.
- Don’t use AHA products for 14 days after needling.
- Enzyme peels are recommended after three days to reduce flaking.
- You can have peels, microdermabrasion, and microcurrent (non-surgical facelift) treatments two weeks before or four weeks after needling.
What can I expect to experience after my needling treatment
Immediately after your treatment, your skin will be red and a little inflamed. After a few days, your skin may flake. Don’t remove these flakes by exfoliating or shaving (wait five days before shaving). We recommend you use an enzyme peel on day four or five after your needling treatment. Applying moisturiser will help to hide the flakes.
Topical vitamin A can also cause flaking, exacerbating this response. Use a rich moisturiser to help with this.
If you’ve had treatments such as IPL or Thermage before, your skin might not become red or bleed because they reduce your capillary action. However, bleeding may increase with subsequent treatments because needling restores the capillary network, especially when treating acne scars.
Needling readily reduces superficial pigmentation unless the melanin has migrated below the epidermis, in which case it may not be successful. In this case, needling will still help to prevent the condition from worsening because it strengthens the Dermal/Epidermal Junction.
Aftercare
It’s vital you follow-up your treatment with proper aftercare.
- Day 1: your skin –will feel tight and dry – use hyaluronic acid.
- Day 2: you can return to work, restart your usual skin routine and can wear make-up.
- Day 3: the pinkness and swelling will subside.
- Day 4 – 6: Flaking may occur – you can apply an enzyme peel to help.
Other aftercare guidelines include:
- Don’t use glycolic for two weeks.
- Avoid the sun for four weeks and use sunscreen.
- Wait five days to shave, wait longer if your skin is still flaking.
Milia
Needling won’t resolve milia, which are small, bump-like cysts that form under the skin. Dr Setterfield recommends using three to six grams of enteric-coated omega-3 per day. Remove any remaining milia after three months.
Contraindications and Precautions
Take note of the following contraindications and precautions if you are considering skin needling:
- If you are prone to getting cold sores, needling may trigger them. Use prophylaxis.
- If you have Rosacea or need to diffuse redness, then salon/clinic needling is not for you as needling will increase the capillary network and cause inflammation – which are the two things we want to reduce in these cases. You may be able to try home rolling though.
- Do not perform needling if you have an auto-immune disease or Hashimoto’s as needling will stimulate an immune response.
- Do not needle over permanent filler.
- Do not perform needling on active acne.
- Do not perform needling if you have eczema or psoriasis.
- If you take coumadin, you will be at risk of bleeding.
The following medications or supplements can prolong your bleeding time and increase the risk of bruising4:
- Aspirin
- Ibuprofen
- NSAIDs
- Vitamin E
- Omega 3
- Ginkgo Biloba
- Garlic
- Ginseng
- Dong Quai
- Feverfew.
The following drugs are photosensitizing5:
- Antibiotics
- Antidepressants
- Antihistamines
- Anti-cholesterol agents
- Fluorouracil
- Methotrexate
- NSAIDs
- Accutane
- Benzoyl peroxide
- St. John’s Wort
- Dong Quai.
Limonene and grapefruit seed extract found in topical products are also photosensitising.
The best choice for healthy skin
Developments in beauty treatments mean that we understand skin needling better these days. We’ve learned that we don’t need to needle as deep to stimulate collagen via a wound healing response as initially thought. We use this treatment less aggressively these days as we now understand that the superficial cells communicate down to other cells. We’ve also learned that skin needling can lead to other improvements to the skin such as the clearing of acne, smoothing of the epidermis, and balancing out of spots caused by UV damage.
Home needling achieves greater ingredient penetration and improves cell communication, also making the skin healthier.
Remember that it takes time for collagen to be remodelled and that results will be seen three months to one-year post-treatment. Results will be subtle.
In a nutshell, skin/micro-needling is a great treatment to refresh your skin and reboot it so it functions at its best, helping you to achieve optimal skin health. In other words, it’s the best choice for healthy skin!
Your Skin Needling Therapist, Marlene De Martin
Marlene has a wealth of training and experience in micro/skin needling treatments. She’s worked hard to stay at the forefront of changes in treatment methods and protocols so that her clients get the best results possible.
Her training includes:
- 2008 Environ Skin Needling training
- 2009 Dr Setterfield training
- 2010 Skin Inject training (roller)
- 2011 Skinstitut Skin Inject Training (roller)
- 2014 Dermaviduals Skin Needling training (roller and pen)
- 2015 Eclipse Micro Pen training
- 2016 Eclipse Micro Pen training part 2
- 2017 Skinstitut Micro-Needling training
Our goal is to help you look and feel beautiful. We perform all our treatments in a private room with relaxing, soothing music and scents. Contact us today to chat about your beauty challenges.
References:
- The Concise Guide to Dermal Needling, Third Medical Edition – Revised & Expanded, Dr Lance Setterfield, MD. 2017
- https://aestheticsjournal.com/feature/an-introduction-to-medical-microneedling
- The Concise Guide to Dermal Needling, Third Medical Edition – Revised & Expanded, Dr Lance Setterfield, MD. 2017 Pg 135
- The Concise Guide to Dermal Needling, Third Medical Edition – Revised & Expanded, Dr Lance Setterfield, MD. 2017, Pg 92
- The Concise Guide to Dermal Needling, Third Medical Edition – Revised & Expanded, Dr Lance Setterfield, MD. 2017 Pg 93